House Framing
for Do it Yourself House Kits
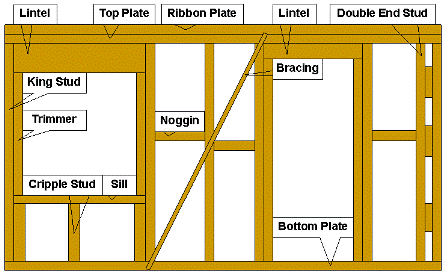
Your kit house framing will arrive in a stack so start sorting them by separating the internal house frames 75mm (3") studs from the external 90mm (3.5") studs. You will note they are all squared and pre-braced and are truly DIY walls. Place the internal walls on your Layed Sheet Flooring before erecting the external walls! Think about that. They are rather difficult to squeeze through or throw over once the outer walls are up!!
House framing instructions, requiring only basic carpentry, are provided in the manual and initially describe the marking system eg the externals will be numbered and the internals will be lettered. Before standing externals, install at least two bottom plate strap ties per frame. Go to my Steel framing page here.
Standing house framing
See my 'easy framing tips' e-zine article here .
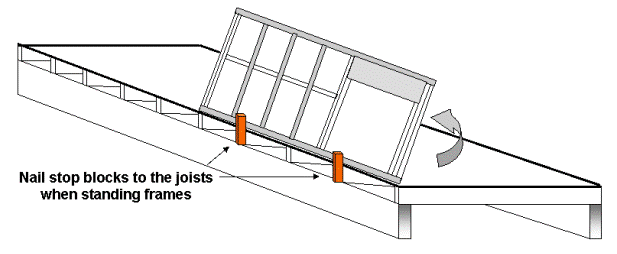
Spring a chalked line around the perimeter of the floor to indicate the inside edge of the bottom plates. Start at the No.#1 corner by pushing up two corner walls to connect to each other and hold each other up. Use blocks nailed to the outsides of the floor to aid and stabilise the erection process.
Stand the internal walls as you go to help stabilise the structure. Ensure the outside of the bottom plates are adjacent to the chalked line as you go then nail the frames to the floor. Apply temporary nails to connect the king studs together.
Plumbing house framing walls
It is sometimes easier to do
this process as you go. Using a long straight-edge against the corner or
end studs, check to see if the wall is standing vertically plumb, if
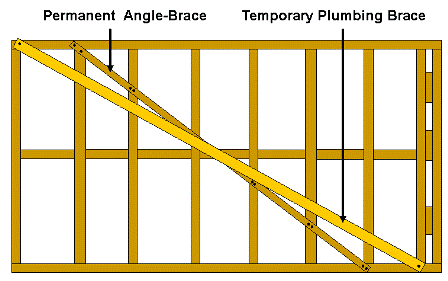
not, release the permanent brace and attach a temporary 50x35mm (2"x1")
brace to the stud under the top plate.
Manoeuvre the wall until it appears vertically plumb, brace with a clamp, then half nail the other end of the temporary brace to the diagonal end of the bottom plate. Check again, then hammer home the temporary brace and renail the permanent brace.
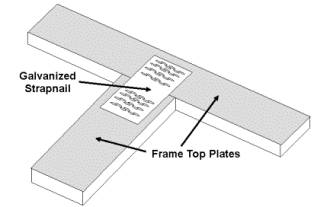
As each section is plumbed apply a minimum of 10 nails (depending on your house framing instructions) to connect each section to the next. Use strap-nails to connect each of the top plates.
Installing Framing Anchors
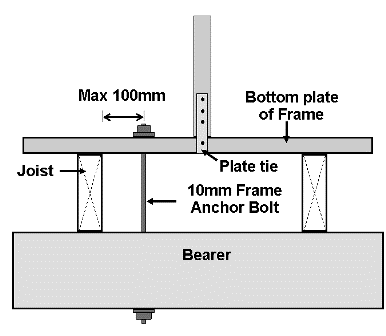
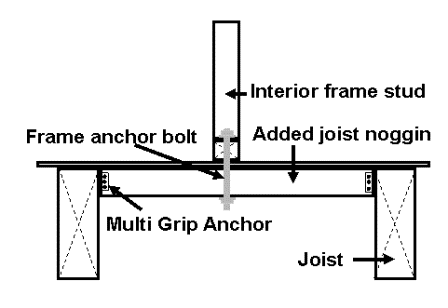
Install two anchor bolts per frame at points 100mm (4") or less from joists and if possible close to bottom plate ties. Using a long auger bit drill down through the bottom plate, flooring, and through the bearer. Install threaded bolt, using large flat washers and tighten. Interior walls should have at least one anchor bolt and may need a joist noggin to attach to.
Plumbing Top Plates
Run a string line along the outside perimeter of the top plates and tighten. Attach temporary braces at right angles to studs under the top plates near where each frame joins. Manoeuver the frame inward or outward at the top plate until it just touches the string line then hammer home the brace to the floor or an interior wall.
Hint: leave all temporary braces attached until the roof is complete.
Finishing the House Framing Braces
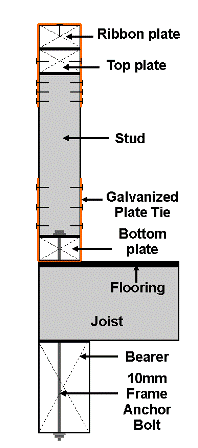
Install Ribbon Plate along the top plates with nails every 600mm (25"), making sure the butt joins are not over frame joins. External walls need to be braced from the top of the ribbon plate through the top plate, and down through the floor, bottom plate and bearer to the foundation. This can also be done using a long threaded rod and nuts, if specified for high wind areas.
Plate ties strapped over the ribbon plate (adjacent to bottom plate ties), with the anchor bolt, complete the bracing system to the bearer.
Additional plywood bracing will be supplied to brace and anchor house framing at various places around the exterior where angle bracing cannot be used. Install using the nailing pattern specified on your kit plan, usually at 100mm (4") spacings along all studs, ribbon and bottom plates) and install plate ties over this bracing.
Final Wall Frame Checks
1. Ensure all walls are plumb and straight using straightedge, and string line.
2. Make sure rooms are square, especially wet areas.
3. Make sure all joins are nailed
4. Check all wall connections are strapnailed
5. Ensure anchor bolts are tight
6. Check the bracing is complete from ribbon plate to bearer on each frame.
Your timber frame house plans will show it's now time to build the roof.
See my steel frame construction pages here
The next step is to go to our
Roof Truss Installation Page
Or you can check out the
Steel frame kit page
Go to Kit Home Basics Home Page
