Raised Floor Systems for kit homes
Raised floor systems for home building kits are supplied ready to assemble out of the box. Bearer beams, wooden joists, bridging nogs and sheet flooring all pre-cut to exact specifications, including all fixings. Determining joist size usually requires floor joist span tables , but house kits come with pre-engineered beams, wooden floor joists and easy construction plans.
As you can see from the graphic below, they are uncomplicated setups that a solo worker can easily achieve. Basic carpentry skills and tools will help you get your kit house off the ground and give it the curb appeal you are looking for.


Components of raised floor systems
- Steel piers
- Bearer beams, sometimes two sets to laminate together
- Wood or steel floor joists, floor joist size will be preselected
- Bridging noggs
- All fasteners
- Joist hangers and triplegrips-depending on design
How to lay your bearer beams
Set your bearer beams out beside your pier posts and determine how best they can be arranged, making sure bearers are joined over piers. Site the bearer edge to check for bows and set bearer with any bows uppermost. As there is only two bolt holes in the pier, basic carpentry joints need to be cut in the bearer ends to allow each to connect to the pier. Here are a couple of examples of joints which can be easily cut with a speed saw and sharp chisel.

Seal the joints and end grains, as well as where the bearer sits on the pier, with wood sealant or paint. Clamp the bearer to the pier housing, drill bolt holes, thread through galvanized bolts and use large square washers and gal nuts. Tighten with a ring spanner. Remember 'tight is tight, too tight is cracked'. Come back in 24 hours and nip them up if required. Trim off bearer ends if required and seal. Use an electric plane to eliminate any bows that might impact on your floor joists.
For guidance to lay your joists, go to my Floor Joist page here
Raised floor system: flooring
Modern DIY flooring can be specified in your kit home inclusions to include particle board flooring or tongue and groove soft or hardwood. Sheet flooring can be affixed directly and securely to correctly laid joist and bearer piered floor systems.
There may be many types of wood flooring on the market, but the best way to install a wood floor is to use structural sheeting which covers 3.6 metres x 0.8 metres: that's nearly 3 square metres (3.2sq yards) per sheet. A 100 square metre (110 sq yard) floor can be layed by the DIY flooring handyman-that's you sunshine-in under two days, with a speed saw and nail gun or cordless drill. Particle board flooring has a pvc tongue on one edge and a receiving groove on the other.
 |
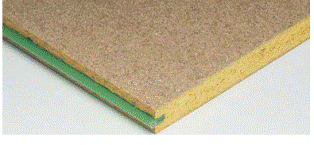 Structafloor Structafloor |
The resin enriched surface of modern particle flooring ensures weather durability and can be left exposed for a few months. They are also supplied with treatments against fungus and termites and all edges are wax sealed. They are designed to be laid as a platform for the erection of frame walls.
Raised floor systems: how to lay structafloor sheets
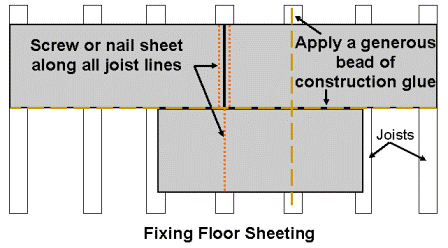
Draw a centre line square to the edge across your floor lengthwise using a string-line. Start by laying the first sheet length ways across the wood joists with the tongue facing forward. The combination of 3.6 metre sheeting length and 450mm joist centres ensures the 'butt ends' meet and are supported at the centre of the joist.
Lay a thick bead of wood flooring adhesive along the joist, firm the board down in place and secure with nails or screws at 150mm centres at butt ends and 200mm centres for field nails.
 |
 |
Lay the next sheet sideways along the joists and trim off the last board where necessary. Stagger boards to ensure floor strength. When inserting a board into a groove lay a bead of glue on the tongue and insert firmly until the edges meet. Wipe off any excess glue and secure as you go.
Tips for building floor systems
- Ensure correct sub-floor clearance and ventilation (min 450mm)
- Set out joists to suit sheet size and thickness
- Protect sheets from the weather before installation.
- Make sure butt joints are supported by joists or noggings
- Avoid build-up of concrete, plaster and paint on layed floor.
- Do not allow water to pool on sheets
- Do not stack heavy concreted loads on floor panels.
- Do not Bondcrete or otherwise seal floor during construction – this will prevent floor drying out properly.
- And a final hint – screws (rather than nails) produce a better squeak–free finish for DIY installers.

Our floor joist setup page sets out easy to follow guidelines for completing wooden floor joist layouts.
Go back to Setting out Plans
For steel wall framing go here.
You can also go to Kit Home Basics Homepage.


