DIY Roofing systems
for kit homes
For DIY roofing, there is no easier set up than the systems kit home suppliers deliver. Metal roof installation systems can be daunting for the owner builder, but when the roofing materials: corrugated iron and house gutters, barges, battens, and ridge capping arrives precut, along with house insulation and roofing screws and an easy installation guide, your new roof will go on with ease. So working out how to roof a house can be easier than you think.
On previous pages we erected the trusses and braced them to the frames. In the next few pages we will show how easy diy roofing installation is on your kit home.
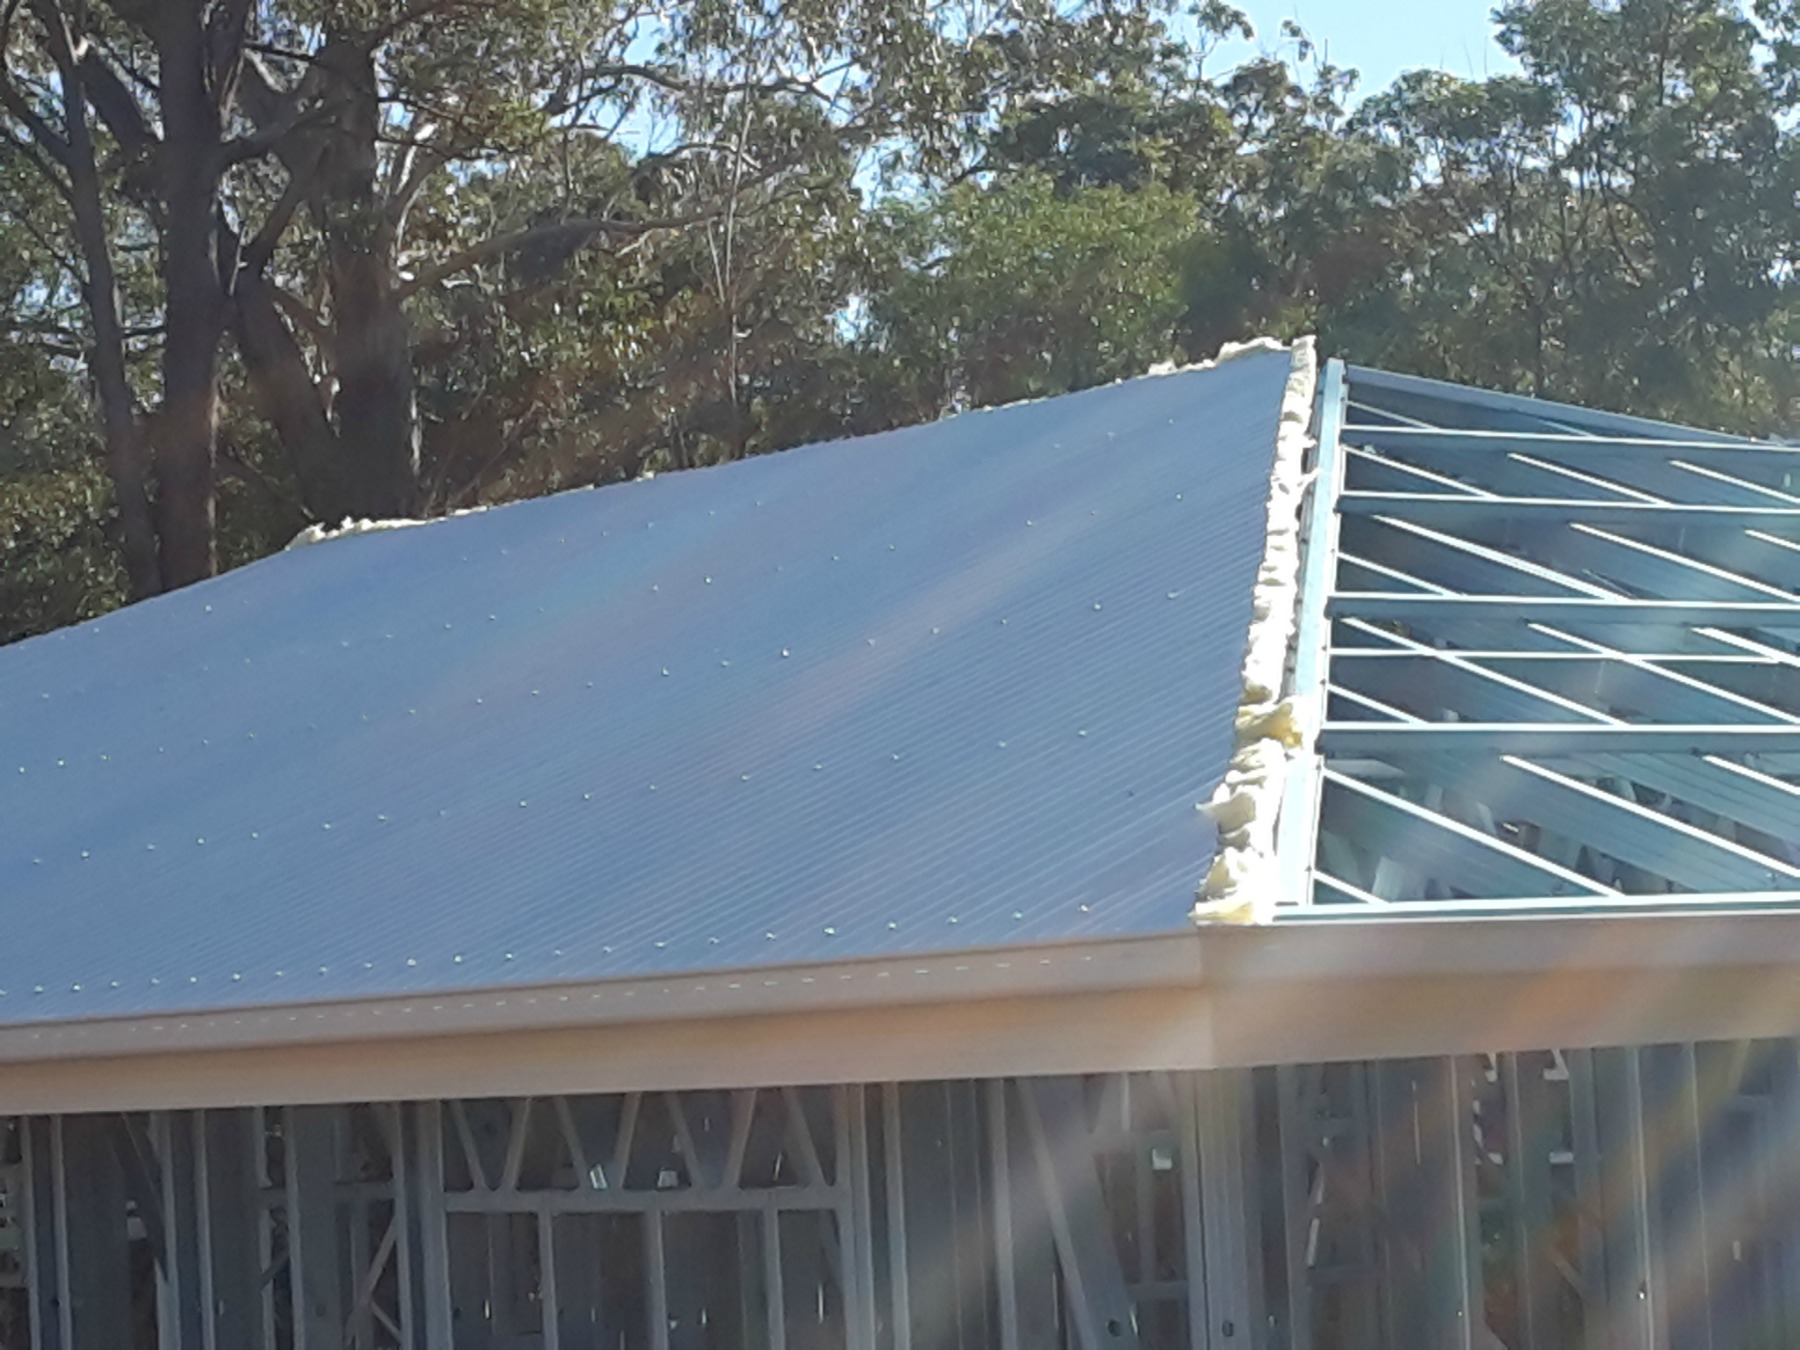
 Roof system intalled
DIY Roofing materials
- House gutters, outlets & downpipes
- Steel roof battens
- Fibreglass house insulation (sisalation)
- Corrugated iron
- Fascias
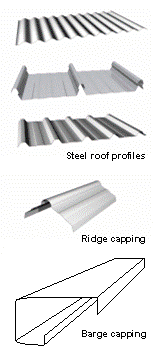
- Ridge capping
- Barge capping
- Roofing screws
 Steel batten
Types of corrugated roofing
- Corrugated galvanized iron describes the original product that was wrought iron plate coated with zinc and then roll formed into corrugated sheets. This product is still used in some areas.
- Galvanized steel. Still manufactured but mostly used for heritage products.
- Zinc 55% / aluminum 43% / silicon 1.6% coated steel. Sold under various trade names. i.e. "Zincalume". Often left in the zinc finish, but more widely with factory coated colors (colorbond).
- Metal tile sheets made of high quality zinc coated roofing steel and polyester coated on top
- Stainless steel. Available for harsh conditions, rollformed and fixed similar to corrugated steel profiles.
- Aluminum - One of the longest lasting metals, but somewhat expensive. Aluminum roofs are lightweight, corrosion-resistant, and have high reflectivity, which may help increase a building's energy efficiency.
- Copper - Usually used for flashing or very small sections like covered entryways.
- Stone coated steel - Panels made from zinc/aluminum coated steel with acrylic chip.
- IBR or Inverted Box Rib is a low-cost corrugated square-fluted iron roofing used mainly in the South African market.
Installing metal roof battens
Metal battens are relatively easy to install, starting with the truss apex battens. Hit some guide nails into the trusses to sit the battens on so they end up 100mm (4") from the truss apex. Using a good 18-24 volt cordless drill, attach the batten to the trusses with roofing screws. Now install the end batten at the overhang of the trusses, 50mm (2") from the ends. Install the inside battens at maximum 900mm (36") centres as evenly as possible up the truss top chord.

DIY Roofing: as an owner builder
Professional roofers installing metal roofing will tell you how difficult this job is. But not when the iron is pre-cut and the amateur roofer so determined. Metal roof installation can be easily achieved via a systematic process, with straight and true roof lines as a result. I did it myself with 'No Help'. I lifted (slid) the iron onto the roof, positioned it and screwed it down. If you are a sole worker you just have to nut out the process, choose a still day (no wind) and take your time.
Of course if you hire help it will go on in half the time, if you have a time limit. But half the time costs twice the money. You do the math sunshine. A modern corrugated roof is a cost effective and obtainable option for the kit home builder. Obtainable, because you can build it yourself with little or no help. To learn how to install metal roofs you need to first understand the components you will use.
Types of roofing products
The familiar roll formed shape of a corrugated roof dominates most non-tiled houses of the 80s and 90s, but this decade saw the rise of more angular profiles and more use of aluminium. Less folds and more height in the rib allow greater spans with less support, hence less building cost. They also offer lighter weight and require less fall to move storm water.
Advantages of steel roofing
• Lightweight and portable
• Durable and long lasting, especially when coated in modern finishes
• Large range of profiles and designs
• Fire and spark resistant
• Recyclable
• Labour efficient
DIY Roofing supplied with a kit home
1. Steel roofing cut to length
2. Various length metal roof screws
3. Barge capping
4. Ridge capping
All of these roofing materials are in pre-selected bonded colour.
Installing metal roofing
You will need good gloves, sun lotion, hat, 18volt+ cordless drill with a tech screw driver bit for metal roof screws, chalked string line, tape measure, and if you have hips and valleys etc you could use a cordless nibbler.
To prepare for the corrugated roof we have installed the trusses, fascias, guttering and insulation . If you are a lone worker, try to work out how to slide the corrugated roof sheets up onto the roof safely and without damaging the gutters. I rigged up a movable bracket lined with carpet!! I pushed up 8 metre (8.5yd) sheets without any problems. Took me twice as long admittedly, but I had more time than money so... all I had to do was pick low wind days.
I had a couple of strategically placed ladders up inside the roof framing and used them to gradually move the sheets up the trusses. Before you lift your sheets, turn up the lower ribs with a shifter, this will prevent water blowing back under the ridge cap. The prevailing wind should determine your sheet laying path ie start at the opposite end to where the wind comes from.
Check you have all the roofing materials at hand and ready to install. Push your first sheet over to the gable end and set it up flush with the end of the roof batten and parallel with the gable fascia. Check that the sheet hangs 50mm (2") into the gutter and is just short of the apex. Secure the sheet with metal roof screws 3 ribs from the gable (that's the 'high' rib). The edge will be secured with the barge capping later.
Overlap the sheets one and a half laps (corrugations) or as specified with other profiles. Every second sheet measure across apex and base to make sure your sheets are straight. You can also mark off the battens every metre to keep track. The pattern for normal wind areas is a metal roof screw every second rib along the base, and every third in the middle rows. Leave the top until the ridge is on.
DIY Roofing: Installing barge and ridge capping
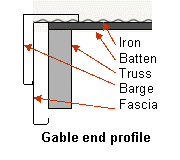
Barge capping is installed first over two or three ribs and down the fascia. Depending on the style you want, cut the ends adjacent to the guttering. Screw the capping down through each batten.
Ridge capping comes in maximum 6 metre (6.5yd) lengths and should be started at the same end as the roofing was started. You will have to make a decision here whether to get a pro to scribe and cut the cap so it sits nicely in the corrugations, or have a go yourself. You can also decide not to cut the cap and instead insert precut corrugated foam sealer. If you do decide to cut the cap, lay it on the apex and clamp it in the exact position you want to install it.
Mark out the centre of each corrugation on the cap. Make a template of stiff cardboard or plastic that exactly replicates the curve of the cuts you need to make in the cap. Start with the least visible side of the ridge on your first try. Use a nibbler or a very sharp and curved pair of tin snips to cut each curve out of the cap. It is a good idea to touch up the cuts with coded paint to inhibit rust. The cap is then attached with metal roof screws into the batten every second rib.
There you have it, I'll have you installing metal roofing like a pro sooner than you think. Here is a picture of my finished corrugated roof.
For the next step in my DIY Roofing pages go to
Installing House Gutters
. Or go to the Roofing Insulation page . You can also go back House Construction or go to kithomebasics home page


