Shower floor construction
The shower floor construction in my new steel kit home began with the slab builder screeding a slight slope towards the centre of the room to assist overflow catchment. Now this didn't help the shower setup at all as my idea was to build a large walk in shower, at least half the size of the bathroom. In fact I now call it my shower room, as there is no bath, just a big shower, so some clever hobbing was required.
My shower floor design was for a 1400 x 1400mm square in the corner of the room with a hobbed surround to support the frameless glass. It would require the following tasks:
- waterproofing
- hebel hob creation
- hob glue down
- floor slope screed

Shower floor construction: Creating a surround hob


This shower floor construction required a hob to be fashioned and hebel block (aerated concrete) was my preferred option. I had never used it before and was happy to give it a go before the water-proofer arrived, so I bought 7 blocks, each 600mm x 300mm x 100mm at about $7 each, watched a couple more youtubes, and set to work. I needed my hob to be a total of 100mm wide, so a 100mm tile could be laid on top with two vertical tiles under it. That meant the hebel had to be about 75mm wide to start with.
Well, I didn’t enjoy my first few cuts, which resulted in broken blocks. They were brittle and required a few different tools to get them to split correctly. Using a hand saw works to a point, but the saw wanders a bit and the cut ends badly. I ended up using my grinder with a concrete disc and made a channel around the block and finished the cut with the saw. I made sure I didn’t force the cut as this ends badly as well. A mounted speed saw with a brick cutter blade would have been a good choice. Once I had made that 75mm cut I laid them out and got them trimmed and square. I then had to trim off the bases to make them level, as my floor had a fall. I was then ready to seal the shower.
Shower floor construction: Waterproofing membrane


As it was a new house construction I needed a waterproofing contractor to do the waterproofing and supply a certificate. Step one was to apply sealer prep onto the concrete. Waterproofing products are noxious stuff so the windows were open and a fan was on full blast. Step two was to add corner pockets made from a product called Emer-proof as well as adhesive surrounds for the drain. Step three was to apply the first coat of water-proofing to the wall/floor edges and corners. This product: Ardex Rapid, was water based and had less odour, but we still had the fan going to dry it quickly. Step four was a full coat on the floor and walls.
Next job was to glue down the pre-cut hebel hob blocks with silicon and then a couple of waterproofing coats on them to finish off the wet-sealing.
Shower floor slope
The last step was to lay a screed of sand and cement inside the hob to produce a shower fall slope of 1 in 6, and was easier than I thought it would be. I used a piece of wood to mimic the strip shower drain so it wouldn’t get damaged.
I marked my screed level around the inside of the hob and shower wall, and keeping the mix relatively dry, I floated with a level both ways to keep it straight.

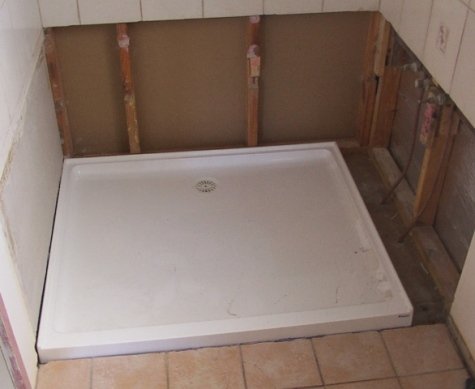
Shower base installation: pre-made
Installation of solid pre-cast ceramic shower bases used in small bathrooms is relatively simple. Make sure your base has adequate slope, a tile flange and is relatively slip resistant. There are other types of shower bases, including fibreglass, acrylic, marble, custom tile and complete bases with shower surrounds moulded in. Some of these are handyman jobs, but others require professionals and a lot of planning. Some fibreglass and acrylic bases have thin paint surfaces and scratch or discolour easily.
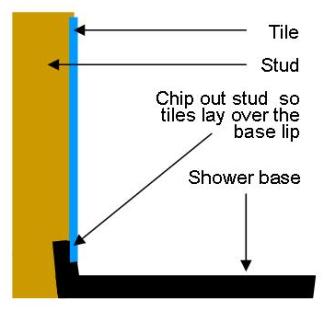
Initially, "check" out the studs of the surrounding frame so the base flange can slip under, enabling the tile wall to lay over the flange. Examine the base and determine the drain exit hole beneath it is in the correct position. Start by priming the floor it will sit on with sealant and if necessary, leveling it with a "self leveling compound". Give it a day to dry before laying it gently on the surface to check it's positioning.
At this stage you need to apply a floor waterproofing compound to the shower floor and walls around it.
If you are installing a fibreglass base make sure it is well supported underneath to limit squeaking and eventual paint corrosion from flexing. I was retrofitting this base so a bit of demolition was required.
Tip: Check shower base positioning and levels before waterproofing
Some plumbers will squirt a bead of silicon around the under-edge, but a ceramic shower base weighs 30 kilograms and cannot move sideways so that's your choice. At this point you can start looking at the type of glass shower doors, tiles and tap assemblies that you want to install. Next task is to connect up the drain and shower trap.
Basic shower drains
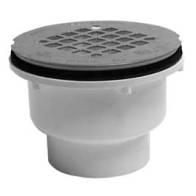
The steps to installing basic shower drains are relatively simple for the owner builder. Legally a plumber should be on the job here, but a basic plan will make you a good sidekick or a expert in diy plumbing. With the shower base in place you need to install two items, firstly a shower drain fitting, and then the drain trap piping. Both are relatively simple fixtures.
At this point you should have already had the shower base in place you need to install two items, firstly a shower drain fitting, and then the drain trap piping. Both are relatively simple fixtures. At this point you should have already had the shower waterproofing applied, best by a professional.
The following is for a 'raised floor' where you have access under the shower. Clean the drain hole area of dirt and dust. Place the grill/strainer assembly down through the hole and put a heavy object on it. Go underneath and screw on the drain body making sure the rubber gasket is on top and will fit up against the underside of the shower base. Don't screw it up yet, but anchor it firmly to the base by wedging it firmly upwards with something. A second person would be your first choice.
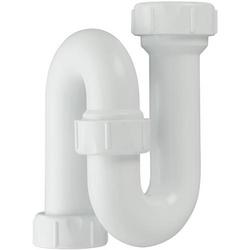 S Trap
You can purchase shower drains from any hardware store or plumbing supply outfit, but have a good look at the directions as some are completely wrong. Disassemble the parts on a table, in line, and study them first. There should be a screw in strainer grill at the top, strainer body that goes down through the hole, rubber gasket and sometimes a fibre gasket as well, and a drain body.
Go back inside your shower and apply clear silicon sealer around the underside of the strainer body and screw down firmly, wiping excess sealer away. And it is done. The next part of installing a basic shower drain is to install the shower trap. Relatively easy, and self explanatory, just make sure the rubber seals are in the correct position and don't over tighten them.
Good ones have a swivel centre so you can easily position it over your exit pipe. You may have to connect it to a floor drain coming from the centre of the bathroom. The same system of assembly can be used here as well. Don't forget to test for leaks.
Go now to Building a Walk in Shower
Return to tiling a shower
or return to kithomebasics home page


